
What’s a Halftone? Screen Printing a Tonal Image
People often want to screen print photographic images and hope to use black and white photographs for this. To do this you need an exposed screen. The way screen printing works is the mesh either has to be open or closed (ink passes through the open areas but cannot pass through the closed areas) therefore grey tones do not work. To make a photographic image work we have to fool the brain into thinking that there are grey areas.
We’ve put together this guide to show you a few ways to use Photoshop to get a tonal image ready for a screen. One of the ways in which to do this is by using a halftone – where the greys in an image are broken down into black and white dots.

Read our guides below for information on how to create a halftone in Photoshop, how to create a ‘cutout’ black and white image and how to get an image ready for halftone software.
If you’re getting an image ready for a Custom Exposed Screen to be made by Handprinted, we can create the halftone for you! Just send us a greyscale PDF and your image will go through our software:
Preparing an image for Handprinted’s halftone software

In order to get your image ready for a halftone it will need to be changed into greyscale mode. To do this in Photoshop, go to Image – Mode – Grayscale. You’ll then be asked if you want to discard all colour information so click Yes.

Halftones will work better on images with lots of contrast. To make your image more contrasted you can use Levels. Go to Image – Adjustment – Levels (or Control + L). Drag the three triangles beneath the graph until you achieve the desired effect. The left arrow controls the dark tones, the middle arrow the mid tones and the right arrow the lightest tones. When you’re happy with the image, click OK.

We require that you send your artwork on an A sized portrait PDF. If you want an A4 screen, we need an A4 PDF. To do this, open a new A4 document. Go to File – New. Choose International Paper on the Preset drop down menu. Change Size to A4 (or A3 if using an A3 screen). Make sure your resolution is set to 300 pixels/inch.

You can then drag your image onto the new document. Use the top arrow on your vertical toolbar. The tool should look like an arrow with a cross beside it. Use the tool to click on the image and then drag your image onto your new tab (probably called Untitled-1). You can then change the size of your image on the document by dragging the corners. Holding down the shift key will ensure that you don’t stretch the image out of shape.
If you need your image to be a specific size, change the size before you drag it onto the new document. Go to Image – Image Size. Make sure the resolution is at 300 pixels/inch and then change the document size. You can then drag it onto the new document and keep it at the correct size.

You can then save your new document as a PDF by choosing Photoshop PDF in the Format drop down menu.

Our software at Handprinted will then change your image into a halftone which will look something like this:

We can expose this onto a screen for you, or send you the screen film to use yourself.
Using Cutout to create a full black and white image
Another way to use Photoshop to create a full black and white image is to use the Cutout filter. You’ll need to change your image to greyscale first (as above) by going to Image – Mode – Grayscale and clicking Yes when asked if you want to discard all colour information. You can then change the levels in the image (as above) using Image – Adjustments – Levels.
Select to Filter – Artistic – Cutout. A box will pop up giving you some options. We need the Number of Levels to be 2 (just black and white). You can move the sliders for Edge Simplicity and Edge Fidelity until you’re happy with the result. You’ll probably want the simplicity to be at 0 to get the most detail out of the image.

You’ll end up with an image that is completely black and white. It will have lost a lot of detail compared to a halftone image but it will be bolder and easier to print, especially on a more open mesh (43T-77T) or onto fabric.

Different images will work give varying degrees of success. This image is more suited to this style:

We can change the Levels (Image – Adjustment – Levels) to give us more contrast…
…and use the same filter (Filter – Artistic – Cutout).

These images can then be changed to the correct size (Image – Image Size – 300 pixels/inch) and dragged onto a new document (File – New) ready to be printed onto a screen film or emailed to us at Handprinted.
Creating a halftone in Photoshop
When you create your own halftone you have a little more control over the outcome of the image. However, if you’re having the screen made elsewhere (for example by us at Handprinted) you’ll need to check that you’re image is not too fine to be exposed onto a screen and you’ll need to be aware that you
may not get all the detail onto the screen.
You’ll need to start with a greyscale image. Go to Image – Mode – Grayscale and then select Yes.

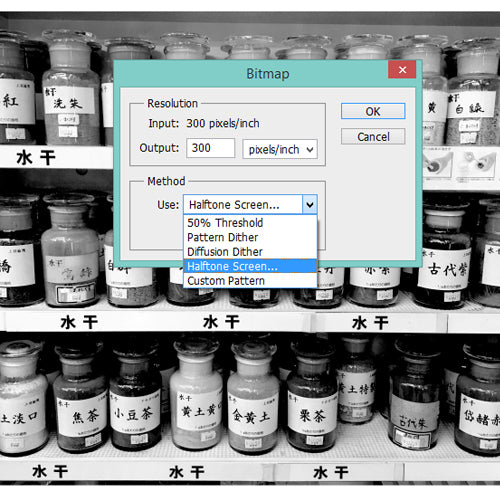
Change your Levels for a more contrasted image if you like (Image – Adjustment – Levels). Make any changes to the size now, or drag your image onto a new correct sized document and then you’re ready to change to a halftone. In Photoshop it is called Bitmap Mode. Go to Image – Mode – Bitmap. You’ll then have options for how you would like to proceed. You want your Output to be 300 pixels/inch. For Method choose Halftone Screen…

Your Frequency should be around 45 – 55 lines/inch for paper, or 25 for fabric. Choose your Shape – this will be the shape of the dots. We’ve gone for Round.

The higher the DPI (dots per inch), the more detailed your image will be in Bitmap Mode. This mode can be a little tricky though as, once it’s been converted, you cannot drag the image onto another document or easily change the size without distorting your halftone or losing detail – ensure you make these changes first and change to Bitmap Mode last.

For check your image is ready to be made into a screen, take a look at our artwork requirements for exposed screens or for more information, email us!