
Drypoint Printing
Drypoint is an intaglio printmaking method that involves scratching an image into a plate with a pointed tool. These lines create a burr that holds ink, meaning that the print reveals the drawing. Intaglio printmaking is the opposite of relief printmaking as it is the positive marks that are printed rather than the areas that are left behind.
Drypoint is an easy technique to get to grips with and is a great method if you would like to take your drawings into print. It’s easier than etching as it requires less specialist equipment and no chemicals or acids. Drypoint plates can be made in copper, zinc or plastic. We love to use Drypoint Plastic as it is easy to draw into and a drawing can be traced through it!
Here’s how to do it:
Place your Drypoint Plastic over your image. It is a good idea to draw round your plate so you can reposition if needed.

Use an etching needle to trace your drawing with your tool into the surface of the plate. Experiment with pressing hard or softly to create different marks.

You may need to hold you plate up to the light away from your drawing to see how it is looking as it can be difficult to see your marks in the transparent plastic.

When your plate is finished, you are ready to print! First, soak a piece of printing paper. We are using Somerset Satin White 300gsm. You want to soak your paper in clean water for about 5 minutes. This helps to draw the ink out of the burred lines of your plate. After this time, remove your paper from the water and blot it on blotting paper or a clean piece of fabric. The paper should feel very slightly damp to the touch but not wet. If the paper is too wet when printed it will blur the lines of the print. If too dry, your image will appear too pale.


Caligo Etching Ink is oil based and water soluble so it is washable in water. We love printing with this ink. It has a tacky but not too oily consistency and the pigmentation is strong. Squeeze out a little ink onto an inking plate.

Use a dauber or a wadded up piece of fabric to dab ink all over the drawn areas of your plate.

Use a small piece of mount board or an store reward card (make sure it is a soft flexible one otherwise you risk scratching your plate) to scrape the excess ink off the plate. This also helps to fill the drawn lines with ink.

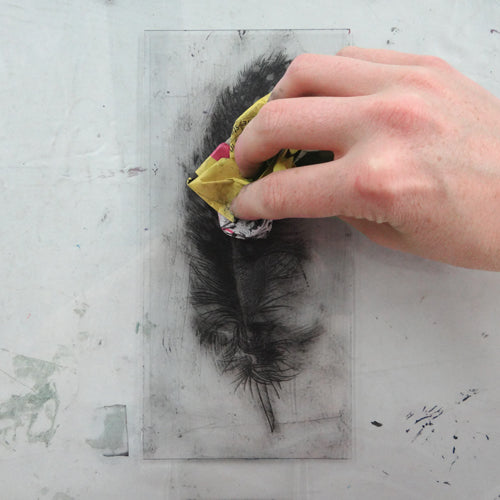
Use scrim to wipe the plate in circular twisting movements, removing excess ink and pushing the ink into the burred lines.

Next, use a piece of newspaper, tissue or an old phone book page and continue to wipe the ink in circular motions. This should start to reveal your drawing.
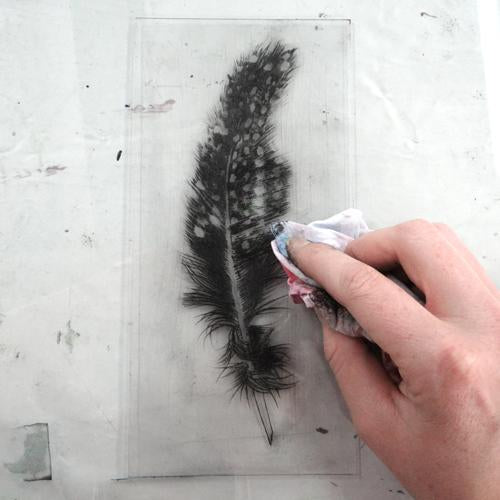
Finally, wipe your plate with a piece of soft fabric. Wad up the fabric and remove excess ink from the areas of your plate you do not want to print. You can create a point with your fabric to wipe small areas of your plate for detail: here we have wiped the centre line of the feather and some of the spots. Wipe the edges of the plate so that a border is not printed onto your paper.

You should be able to see your drawing filled with ink. Any smudges can be removed with the fabric. For a little plate tone, leave some of the smudged ink on the plate – this is an opportunity to be a little experimental with your image, much like you would be with a mono- print.

To create a registration sheet, use a large sheet of paper (photocopy paper is fine) draw around the piece of printmaking paper, remove and then position the drypoint plate onto the registration sheet and draw around this. This will ensure all images are positioned in the same place on each piece of paper.
Place your plate face up on the registration sheet on the print bed. We are using our etching press. Place your slightly dampened paper on top of the plate.

The pressure of the press combined with the dampened paper should draw the ink out of the lines of the plate. The pressure on the press should be quite firm.
After the print has gone through the press, peel off the paper to reveal your print!

Your plate can now be inked up and wiped again for another print! When you have finished printing, the ink can be cleaned up with cold water, washing up liquid and a rag.
If your print appears a little too pale, try wiping less ink off your plate (it is possible that you have removed too much ink) or dry dampening your paper a little more next time.
If your print is a little smudged or blurry, dampen your paper less or blot it more before printing.
If your print appears too dark, wipe off more ink before printing! Here are a few of our prints taken with this plate to illustrate the different styles of inking:

To print a drypoint you will need:
- Paper for drawing and registration sheet
- Pen
- Sheet of Drypoint Plastic
- Etching needle
- Paper to print on (such as Somerset)
- Tray to soak your paper in
- Blotting paper (or a clean tea towel)
- Caligo Etching Ink
- Inking Plate
- Mount board or flexible store reward card
- Scrim
- Newspaper, tissue paper or phone book for wiping
- Rags for inking up, plate polishing and cleaning
- Etching press