
Making a Layered Batik
Back in March we made a reduction linocut from a rather
handsome picture of our very own Handprinted dog, Fletcher (of ‘Fletcher the Screen Printing Dog’ fame).
The reduction lino process lends itself really well to this kind of image because of the tonal build up in the fur. You start by carving out the white areas and then build the image with darker and darker colours, carving away the lino in between each layer of print. We were pretty happy with the results!
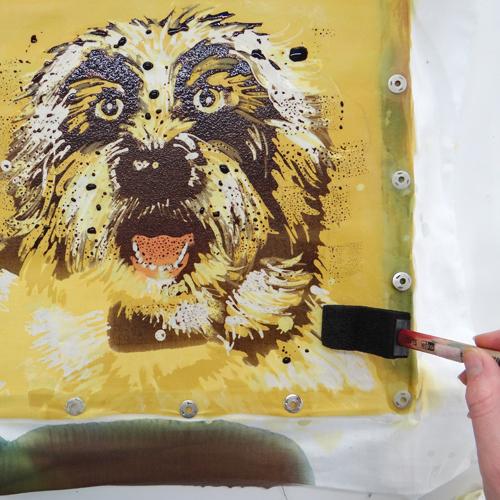
The kind of tonal build up in layers created in a reduction lino works much in the same was as building up a layered batik. We have been really enjoying the Batik Workshops in the studio recently and seeing all the wax pots, tjantings and dyes on the tables reminded us how fun it can be! We decided to test the similarities between reduction lino and batik by using the same image of lovely Fletcher:

He’s a little more shaggy than intended but he looks close enough to the image to be recognisable. We’ve also managed the red tongue that we couldn’t in a reduction lino.
Here’s how this batik was made: This batik was made on Bleached Calico but they also look brilliant on silk and on paper. We are using Procion MX cold water dyes which are easy to use, inexpensive and create beautiful colours.
These dyes can be mixed with Soda Ash (to fix the dye), Urea (to brighten the colours) and Calgon (to soften our chalky South Downs water). When Soda Ash is added to the dye, it begins its shelf life of about 2 hours, after which time the dye will not fix to the fabric effectively. To avoid this, we like to mix up the dye and the dye fixative solution separately.
A good colour range for mixing a huge range of colours is to use two of each primary colour and black (two tones of yellow, two blue and two red). The best Procion colours for this are Lemon Yellow, Golden Yellow, Bright Turquoise, Royal Blue, Orange Scarlet, Magenta and Black. Mix 1tsp of each dye for each 100mls of warm water. This will create a strong dye that can be diluted with dye fix solution.


Pin your fabric to a wooden frame. I like to use Silk Pins as they cause less damage to the fabric than drawing pins. Stretch your fabric tightly and evenly.
Batik uses hot wax as a resist to the dye. The wax is melted in a Tixor Malam Wax Pot. Batik Wax is a blend of paraffin and beeswax, giving the desired amount of ‘crackle’ to the final image. The wax needs to be hot enough to be melted and flow through the tools easily but not too hot to cause fumes or become a fire hazard. This pot seems to work best set at 5 1/2 on the dial but needs to be attended at all times.


If you want to keep your dye from spreading, draw a border around your frame before dyeing. Wait for the dye to dry. If hot wax is applied to damp dye it will not penetrate the fabric and wont resist the next layer of dye – don’t be tempted to wax before it is fully dry!
Apply the next layer of wax to the dry surface. With this waxing, you are preserving any areas that you want to be left pale yellow.
The wax dries almost as soon as it touches the fabric so the next layer of dye and fixative mix can be added straight away. Each colour applied should be darker than the previous colour. Remember that these colours are translucent and will show some of the colour underneath. Blue painted over yellow will become slightly green toned, red over blue will become purple toned etc. Building up from light to dark will help to achieve the colours you want.
Areas can also be sectioned off with a wax border and painted in with separate colours in a single layer.


To make your own layered batik you will need:
- Cotton
- A Wooden Frame
- Silk Pins
- Batik Wax
- Procion MX Dyes
- Soda Ash
- Urea
- Calgon
- Measuring Jug and Spoons
- A Wax Pot
- Tjantings and Natural Fibre Brushes
- Foam Brushes and Brushes for Dye
- Newspaper
- Iron (a separate iron reserved for batik is recommended)