
Registering a Print with Pins and Tabs
We’re really excited to have Ternes Burton pins and tabs in stock! We have already started using them for our own work and wanted to show you a really simple example of how they can be used to register block prints with effortless accuracy. We’ve whipped up a quick reduction print and a multi-block to show you how they work!
Printing a Reduction Linocut using Ternes Burton Pins and Tabs:

You’ll need a pair of pins and a flat board that is bigger than your paper.

Tape the pins to the top of the board using parcel tape. The holes in the pins will allow more of the tape to stick to the board and stop the pins from moving. Place the
lino underneath the pins (leaving enough space for your paper all the way round). Stick the lino down with double sided tape. It will need to stay here for the whole printing process.

Place your paper over the lino. Leave a little extra space at the top that can be trimmed off later if you can.

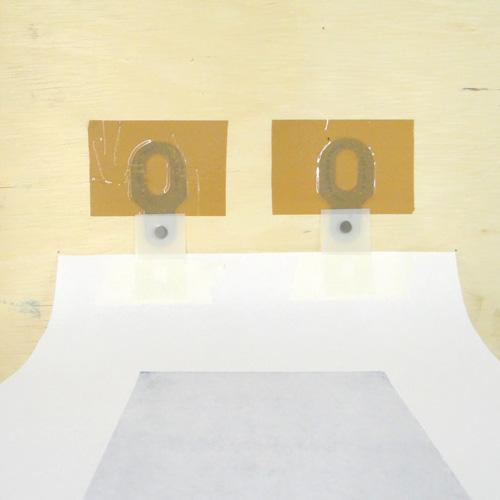
Snap your stripping tabs onto the pins so that they overlap the paper. They should make a clicking sound as they go into place. Stick your tabs down with masking tape. If your paper has a correct print side, make sure the paper is print side down.

Prepare your paper for the whole edition in this way. You’ll need two tabs for each piece of paper in your edition. We sell them in packs of approximately 100.

Ink up your first layer. We inked up our block using Caligo Safewash Relief Inks and a Hawthorn Roller onto an uncut piece of lino.

Click your paper back into place using the strips and pins.

Take your print using a baren or by putting the board through a press. The pins are slightly lower than the height of a piece of traditional lino so will go through a press easily with no damage!

Remove the paper by peeling it off the block and unsnapping the tabs from the pins. Print the first layer of your whole edition this way.

We wanted to use a simple grid to show you the accuracy of the registration.

Carve your block whilst it remains stuck to the board.

Ink it up with your second colour.

Snap the tabs of each piece of paper to the pins and print as before. The paper will go down in exactly the same place as on the first layer.


The edges line up perfectly!
Printing a Multi Block using Ternes Burton Pins and Tabs:
We are using Softcut for this print. It is important to make sure your blocks are exactly the same size and shape.

Stick your pins as before. Use mount board corners or plastic (as we have used here) to register your block. Both of your blocks should be able to slot into the space without room for movement.


Ink up the first block. Place it into the space.

Snap your tabs on the paper to the pins.
Place the paper down and use a baren to take your print.

Ink up the second block and place it on the board in your marked out space.

Snap the paper to the tabs and take your second layer.

You can find Ternes Burton Pins sold in pairs here and Strippng Tabs in packs of 100 here!