
Screen Printing Hand Drawings using Film Marker Pens
Translating drawings into print doesn’t have to include scanning and digitally manipulating your design on a computer. By using opaque film markers onto screen film we are able to skip the digital part altogether and create a photographic screen directly from the drawings you produce. This allows you to work in full scale, even tracing other print layers or design elements so that they will fit exactly.
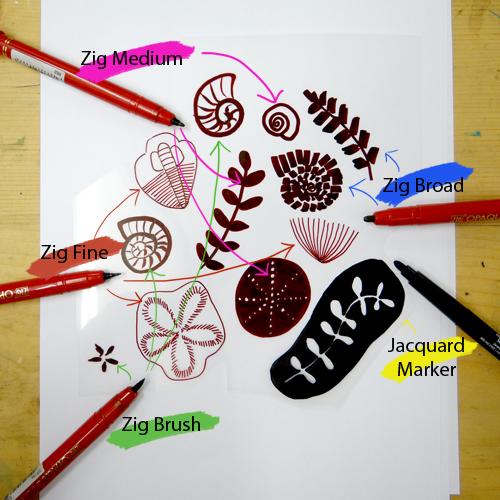
To do this we need screen film and opaque pens. The pens need to be dark enough to block the light when exposing the screen. Other pens may let too much light through and the screen will be over-exposed. We’re using Zig Pens in four different nib types: fine, medium, brush and broad; as well as a Jacquard Film Marker.

Screen film has a right and wrong side on which to print and draw. You can feel this with your finger tips: the correct side will feel slightly tacky and squeaky whereas the wrong side will feel smoother.
Use the different pens to draw onto the film.


The different nibs yield different results and can be used in combination to achieve the look you want.

When your drawing is ready you can make your screen. If you don’t want to do this yourself, ask us about producing a screen for you from your drawings. We are using an A4 90T screen to print on paper.
A screen needs to be coated in sensitised photo emulsion using a coating trough and then dried in the dark. It is then exposed to UV light using an exposure unit, light box or lamp (or even the sun!) with the film in between, blocking the light from certain areas of mesh. Different exposure units and lamps will need different exposure times – if you’re trying this at home, experiment with exposure times first.

Once the screen has been exposed it needs to be immediately rinsed with cold water. The water stops the emulsion from reacting to light. The design should appear paler on the mesh. Rinse the screen until the drawn areas let light through and return to mesh colour (in this case, yellow). A jet wash is perfect for this if used gently but a shower or garden hose will work too.

When the screen is dry, tape round the edges to block off any unwanted open areas of mesh. The screen is then ready to be printed. If you’re printing onto fabric, the screen can be placed directly onto the fabric on top of a padded table. If printing on paper, it’s best to have a ‘snap off’ – a slight gap between your mesh and your paper. Vacuum tables or hinge clamps are perfect for this as they provide snap off whilst holding the screen in place, making it easy to register your print. If you don’t have this equipment, read on for an easy at home way to print onto paper without the use of a vacuum table or hinged board.
We have set up our print area on a padded surface just like the ones we would use to print onto fabric. A blanket has been tightly stretched around a board and then covered in cotton. For right handers, place a piece of newspaper on the right hand side of your work space with your ink and squeegee on top. Left handers reverse this. Place your squeegee on a little plinth such as an empty tape roll to keep the ink from spreading over the handle.

To create our snap off we can use mount board. Tape a little piece of mount board to the base of each corner of the screen – this will keep our mesh slightly away from the paper.

Place the paper on the board – we’re using Kent. Arrange the drawn film on top of the paper. Use masking tape to mark the edges of the paper. Then place the screen on top, lining the design on the screen with the design on the screen film. Mark the corners of the screen position with masking tape.

This method will allow us to place both the paper and the screen down in the same place each time with the print placed correctly on the paper.

Remove the film and place the screen down on top of the first piece of paper. Use a spatula or spoon to put a layer of ink along the top edge of the screen, just a little wider than the design. (If you prefer to flood away from you, place the ink at the bottom of the screen instead).

With one hand holding the screen still, gently use a squeegee at a 45 degree angle to drag the ink down the screen (or push upwards and away from you if flooding from the bottom). Don’t press hard at this point. We are using a grey ink mixed from acrylic paint and acrylic screen printing medium mixed in a 50:50 ratio.

Continue to hold the screen still with one hand. Scrape the excess ink off the squeegee using the bottom edge of the screen. Bring your squeegee to the top of the screen and pull it down the mesh again, this time pressing hard downwards. You should hear a tent zip sound and your design should appear. Check that there are no shiny areas of your design left – if there are, pull the squeegee down hard again.

Peel the screen away from the board. You may need to peel your paper gently from the mesh. Place a new piece of paper in the marked position and repeat the printing steps again for another print until you’re happy with your print run. Use a spatula to remove any excess in from the screen and then wipe the mesh with a soft, cold, damp sponge. Finally, rinse your screen in cold water with a garden or shower hose.


For this project you will need:
- Screen Film
-
Zig Pens and a
Jacquard Marker Pen - Aluminium Screen
- Photo Emulsion and Sensitiser
- Coating Trough
- Exposure Unit (or light such as a work lamp)
- Shower hose, garden hose or jet wash
- Parcel Tape
- Padded surface
- Masking Tape
- Mount Board
- Screen Printing Ink (or Acrylic Paint and Acrylic Screen Printing Medium)
- Squeegee
- Spatula
- Paper to print on such as Kent