
Testing your Copper Sulphate Solution
When you’ve mixed a fresh batch of copper sulphate mordant, or if you have an old batch that you haven’t used for a few months, it’s good practice to test the strength of your solution.
By creating some test strips for both line and tones, you’ll create yourself a reference point that you can use to help plan out your etchings.
This blog is part of a series featuring tips and techniques to get you started with aluminium or zinc plate etching. This post will explain how you can test the strength of your copper sulphate solution.
To make a test strip for lines:
First, degrease your plate and coat it in hard grounds, as outlined in this earlier blog post.
Next, plan for what intervals you would like to test. Our copper sulphate mordant has been made fresh, so we’re going to test our solution with an aluminium plate at 1-minute intervals, and for a total of 5 mins – so 5 stages in total. If your mordant is older, you may want to increase the time.
For each segment, we'll submerge our plate in the mordant for one minute intervals. As we progress to the final stage, each segment will have it's total exposure time as planned.

In the first segment designated for 5 minutes, we made some varying marks into the grounds using an etching needle. We recommend some thin lines, thick lines and some hatching. You only want to make marks into the grounds to reveal the surface of the plate, rather than scratching into the plate itself.

Put some plastic parcel tape on the back of your plate to protect it. Leave a longer piece on the top and fold it over to make a little handle.

Set up two plastic trays side by side. Wearing gloves and goggles, shake up your copper sulphate mordant (see how to make copper sulphate mordant here) and pour it into one plastic tray. Fill the second tray with 2 inches of water.
Get your stopwatch ready and set it to your increment length – in our case, one minute. Wearing gloves and goggles, carefully place your plate into the copper sulphate solution and start your stopwatch.

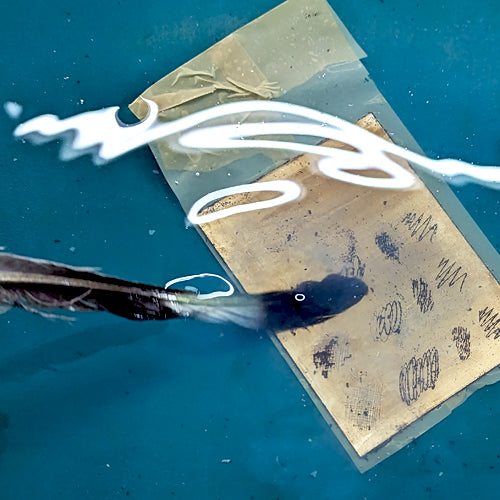
When the timer is up, remove your plate using the plastic tape handle. Immediately place your plate into the water bath to remove any copper sulphate solution. Use a feather to lightly remove any copper particles.

Once rinsed, remove your plate from the water bath. You’ll be able to see all the marks in your segment will have etched slightly.
Moving on to the next segment, make the same marks again.

Take your plate back to the copper sulphate bath for another one-minute dip. Our latest segment is getting a minute of exposure to the mordant, but our first segment is getting an additional minute at this point.
These steps are repeated, until the last segment. Through this process, each segment will have been exposed to the mordant for different amounts of time total, and in your planned increments.

When your plate has had its final dip, clean off the grounds using Zest-It and a cloth, rag or sponge. You’ll be able to see that the marks have different levels of ‘bite’, with one end being the lightest, and one end being the darkest.

You can now ink up your plate and take a print to see how the variety of lines translate to print. Use this print when planning on how long to etch your future plates for.
Here is how our test strip for lines worked out:

Click here to download a larger version
To make a test strip for tones:
First, degrease your plate as outlined in this earlier blog post – but we aren’t going to apply any grounds this time. Dry off your plate using a hairdryer and avoid touching the surface.
Next, plan for how many intervals you would like to test. Because we've made a fresh batch, we’re going to test our solution with an aluminium plate at 5 second intervals, with 5 stages in total. If your mordant is fairly old, you may want to test at up to 30 second intervals.

Next, apply some Stop-Out Varnish to the first segment. The varnish will protect this area and stop the mordant from reaching the plate surface. Remember to use Stop-Out Varnish in a well-ventilated space. Allow the Stop-Out Varnish to dry completely.

Once your plate is dry, put some plastic parcel tape on the back of your plate to protect it. Leave a longer piece on the top and fold it over to make a little handle. This will make to easier to dip in and out of the copper sulphate mordant.

Set up two plastic trays side by side. Wearing gloves and goggles, shake up your copper sulphate mordant and pour it into one plastic tray. Fill the second tray with 2 inches of water.
Get your stopwatch ready and set it to your increment length – in our case, 5 seconds. Wearing gloves and goggles, carefully place your plate into the copper sulphate solution and start your stopwatch.

When the timer is up, remove your plate using the plastic tape handle. Immediately place your plate into the water bath to remove any copper sulphate solution. Use a feather to lightly remove any copper particles.
Once rinsed, remove your plate from the water bath and dry off using a cool hair dryer. You’ll be able to see that the exposed surface of the plate has changed slightly.
When your plate is dry, apply some more Stop-Out Varnish to the next segment and allow it to dry.

When the varnish is dry, take your plate back to the copper sulphate bath for another 5 second dip.
Same as before, remove your plate from the copper sulphate solution when the timer is up, and place it straight into the water bath. Dry off your plate again and apply Stop-Out Varnish to the next segment. Once dry, it’s back to the copper sulphate solution again.
These steps are repeated, until there is only one segment left exposed and all the others have had Stop Out Varnish applied to them. Through this process, each segment will have been exposed to the mordant for different amounts of time.
When your plate has had its final dip, clean off the Stop-Out Varnish using Zest-It and a rag.

You’ll be able to see that the plate segments have different levels of ‘bite’, with one end being the lightest, and one end being the darkest.
You can now ink up your plate and take a print to see how the variety of tones translate to print. Use this print when planning on how long to etch your future plates for.

Here is how our test strip for tones worked out:

Click here to download a larger version
More Tips
- Once degreased, remember not to touch the exposed metal with your fingertips, as you may transfer grease to these exposed areas which will act as a resist to the mordant. This will stop your marks from etching.
- It’s good to do test strips when you’ve freshly made your solution or if you’ve rejuvenated your solution. It’s also useful to do test strips if you haven’t used your solution in a while or if you’ve noticed a change in the strength of your solution.
- Aluminium and Zinc plates have different reaction times, so if you plan to use both in your work, you will need to make test plates with both metals.
For this project, you will need:
-
Copper Sulphate Mordant
-
Two Plastic Trays
-
Paint Brush
-
A Stopwatch
-
Dry Rag
- A Hair Dryer